
You've found the perfect iPhone photo, but the upload form won't accept it. On your phone, the image opens normally. On an office computer, school portal, HR system, or filing website, it may appear as a blank preview, a gray tile, or an unsupported-file error. The problem usually isn't the photograph. It's the format.
HEIC was created to store modern phone images efficiently, while JPG remains the safer exchange format for websites, older software, office systems, and recipients using devices that don't decode HEIF. If you're researching what are the new iPhone photo formats, the practical distinction is simple: HEIC is efficient for storage, and JPG is broadly accepted for sharing.
This guide separates four jobs that are often confused: viewing a HEIC, exporting one image, converting a batch, and producing an upload-safe JPEG. If the destination is a document workflow, you may also find a browser-based image conversion tool useful when you need a compatible copy quickly.
Table of Contents
- Why Your iPhone Photos Won't Open Everywhere
- Converting HEIC to JPG on iPhone, iPad, and Mac
- Getting HEIC Files Working on Windows
- Using a Browser-Based HEIC to JPG Converter
- Balancing Quality, File Size, and Color
- Verifying Conversions and Fixing Common Failures
Why Your iPhone Photos Won't Open Everywhere
Apple brought HEIF into everyday use with iOS 11, released in September 2017, and used the .HEIC extension for photos captured on the iPhone 7 and iPhone 7 Plus. The underlying HEIF standard had already reached version-one ISO standardization in June 2015, but Apple's operating-system and hardware integration made it visible to millions of ordinary users. Apple's explanation of iOS 11 and HEIF describes the format as offering better compression than JPEG while preserving comparable visual quality.
That efficiency is useful on a phone and in a cloud photo library. The same feature can become a compatibility problem when an upload form, older application, printer workflow, or non-Apple computer doesn't include a HEIF decoder. Software released before iOS 11 or macOS High Sierra 10.13 is particularly likely to lack built-in support.
JPG has the opposite design priority. The JPEG standard, formally ISO/IEC 10918-1 and ITU-T Recommendation T.81, was published in 1992, and its ecosystem now spans browsers, cameras, printers, document systems, social platforms, and enterprise software. The JPEG standards history helps explain why JPG remains the dependable target when a recipient or portal gives vague instructions such as “upload an image.”
Renaming is not conversion
Changing holiday.heic to holiday.jpg only changes the filename. It doesn't change the encoded image data, so the receiving application still encounters HEIF or HEVC content while expecting JPEG data. The result is usually a broken file or an upload rejection.
A real conversion decodes the HEIC image, renders it into an output color space, and re-encodes it as JPEG. That second encoding matters because JPEG is lossy. A careful workflow creates a new copy, preserves the original HEIC, and avoids repeatedly saving the JPEG.
The right method depends on the job:
- View the original: install or enable the necessary decoder if the device supports it.
- Export one photo: use a built-in Photos, Preview, or Files workflow.
- Convert many photos: use a batch-capable desktop or browser process.
- Create an upload-safe JPEG: convert once, check color and dimensions, then test the actual destination.
Converting HEIC to JPG on iPhone, iPad, and Mac
Apple devices can usually handle HEIC without extra software, so the native route is the sensible starting point. It keeps the original library intact and avoids sending personal photos to an external service.
On iPhone or iPad, select the image in Photos, tap Share, choose Copy Photo, open Files, go to a folder, and paste. The pasted copy is generally created as a JPEG. This is convenient for one image or a small selection, especially when you need to attach the result to an email or upload it from Files.
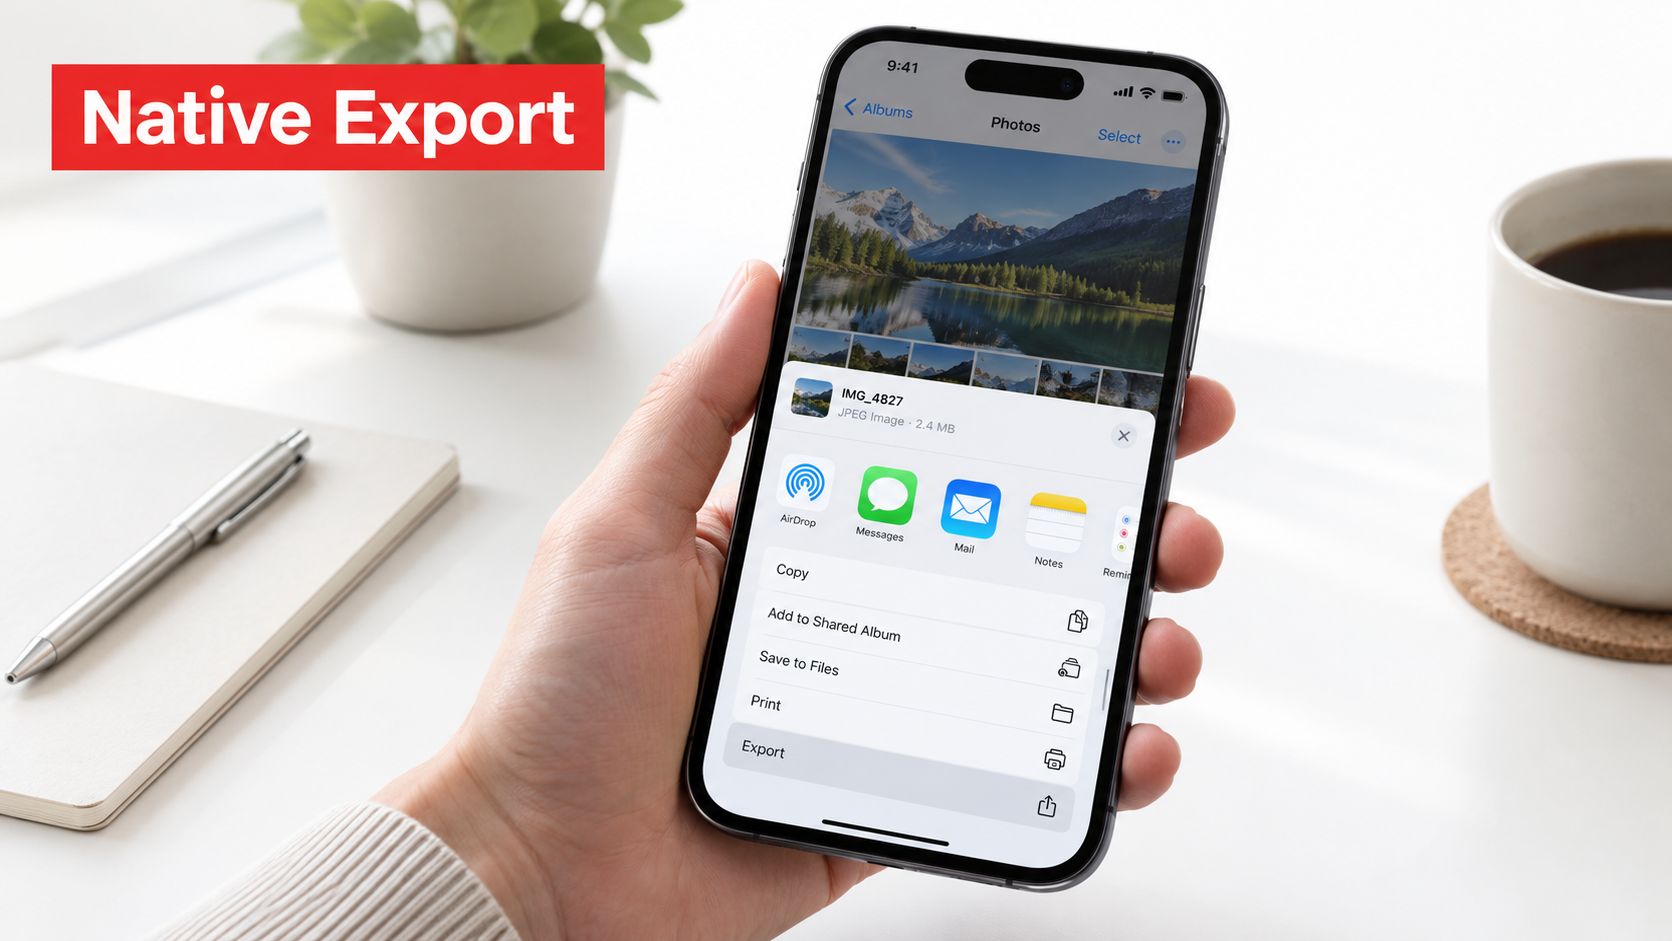
On a Mac, open the image in Photos or Preview, then choose File → Export, select JPEG, and save a new copy. Preview is useful when you want to choose a destination and adjust quality. Finder's Quick Actions can also convert selected images through Quick Actions → Convert Image, where you choose JPEG and an output size.
Decide whether future photos should be JPG
To save new iPhone photos as JPG, open Settings → Camera → Formats and select Most Compatible. This removes a recurring conversion step, but it also gives up HEIC's storage efficiency. The choice is practical rather than ideological. Use JPG capture when immediate compatibility matters more than conserving library space, and keep HEIC when your Apple devices and storage workflow already support it.
The strongest habit is to keep the HEIC as the master and export a JPEG only when a destination requires it. Converting the only copy means you lose the more efficient source and may discard information that the target format cannot represent.
Practical rule: Export a JPEG for delivery, but archive the original HEIC whenever the photo may need future editing or long-term retention.
If you work with camera originals as well as phone images, a separate RAW conversion guide for Mac is useful because RAW files involve different editing and export decisions. For a focused walkthrough of the iPhone process, see this HEIC-to-JPG iPhone guide.
Getting HEIC Files Working on Windows
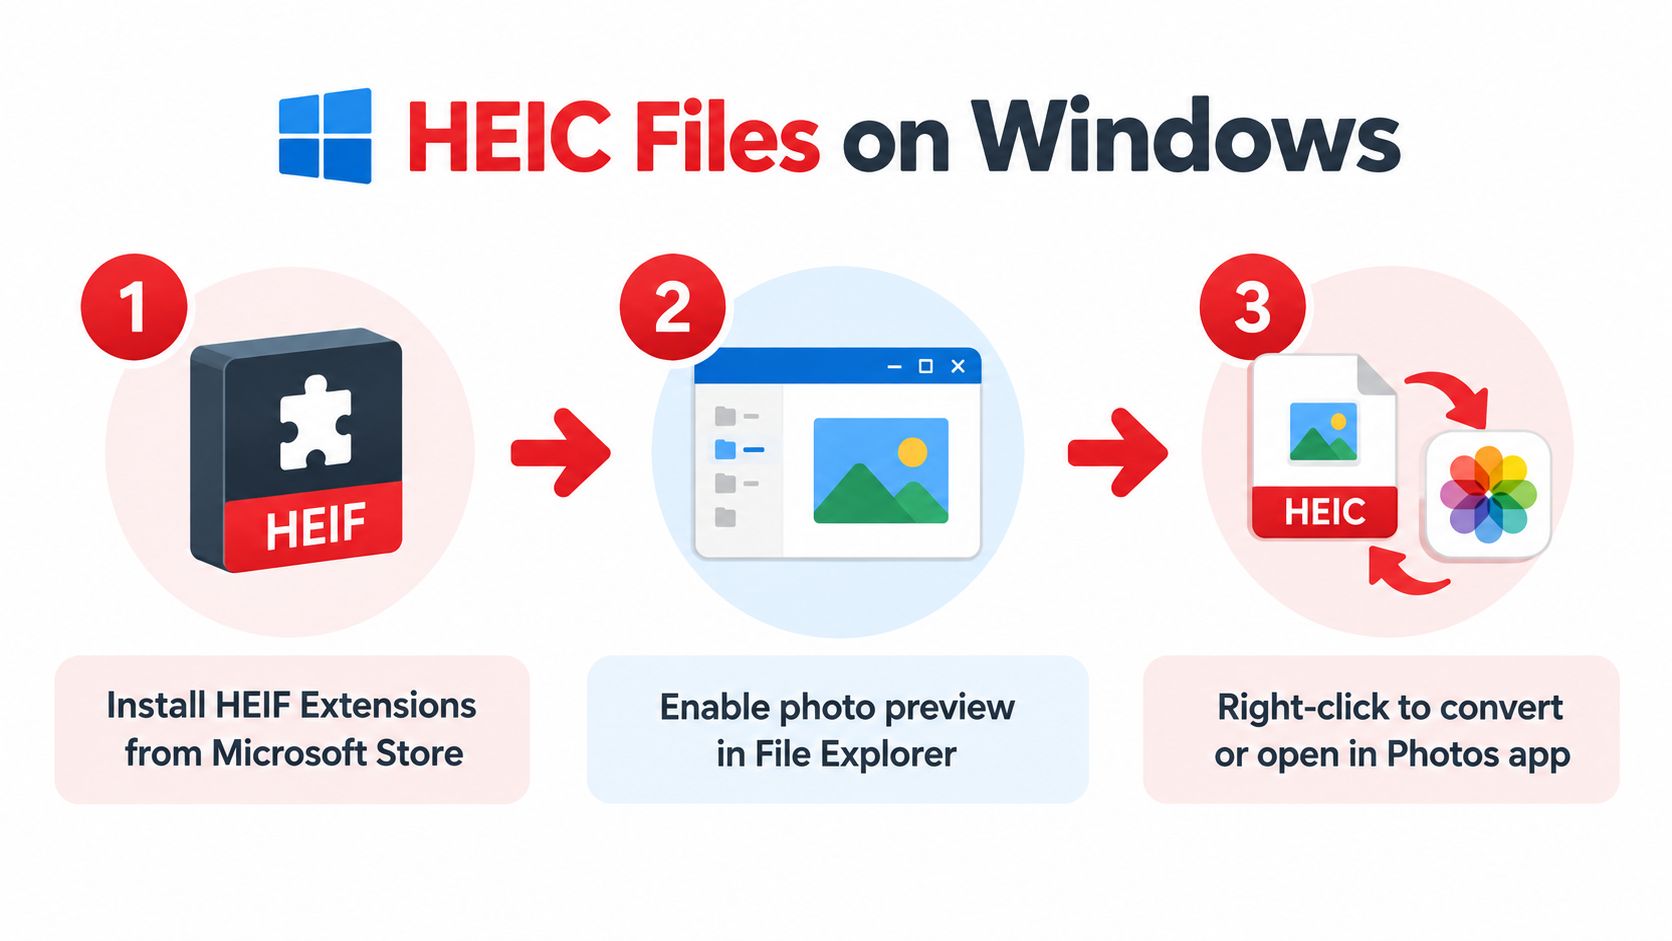
Windows is where viewing and converting most often get mixed together. A HEIC file is commonly a HEIF container holding image data compressed with HEVC. That means a computer may need both the HEIF image extension and the HEVC video extension before its Photos app or File Explorer can display the image. Microsoft notes that HEVC and AV1 support isn't available on every PC, and its guidance explains why users may encounter a two-part codec requirement.
Separate viewing from exporting
On a personal computer, you can check whether the required extensions are available through the Microsoft Store, install the approved components, and reopen the file in Photos. If the image displays correctly, use the application's export or save-as function to choose JPEG. Paint may also work after Windows can decode the source.
A managed work or school computer changes the decision. Store access may be blocked, codec installation may require administrator approval, and an organization may prohibit third-party software. In that situation, ask for an approved offline converter, export the image from an Apple device, or use a browser tool that processes files locally and doesn't require installation.
Renaming the extension won't help. The file still contains HEIF or HEVC data, so the receiving system sees an invalid JPEG. Always create a new file through an actual decode-and-encode process.
Choose the route based on volume
For one image, open the source and save a JPEG copy. For a folder of images, use a batch workflow that leaves the originals untouched and writes the outputs to a separate directory. After conversion, open several results rather than assuming every file succeeded.
A useful Windows HEIC-to-JPG workflow should also account for more than codec installation. A JPEG can still fail in an upload form because of its dimensions, color profile, or file size, so conversion is only the first part of the job.
Using a Browser-Based HEIC to JPG Converter
A browser converter makes sense when you're on a mixed-device setup, can't install codecs, or need a quick one-off export. The privacy question comes first. Some services upload the image to a remote server, while others run the conversion inside the browser so the file stays on your device.
Before selecting a tool, look for a clear explanation of processing location, file limits, account requirements, watermarks, output quality controls, and download behavior. Don't upload identity documents, confidential work, private screenshots, or sensitive client photos to a server unless your organization permits it and you understand the retention policy.
PDFWix's HEIC-to-JPG converter is an example of the local-processing approach. It runs in the browser through WebAssembly, requires no account, has no daily task limit, and adds no watermark. It supports individual and batch conversion, with the output generated on the device rather than sent to a conversion server. You can use its HEIC-to-JPG converter when you need a compatible copy without installing software.
| Criterion | Server-upload converters | In-browser local converters |
|---|---|---|
| File handling | Files travel to a remote server for processing | Files are processed on the device |
| Privacy | Depends on retention, deletion, and service policies | The source can remain on the device |
| Installation | Usually none | Usually none |
| Batch work | May depend on upload or task limits | Limited mainly by browser and device capacity |
| Output controls | Quality and dimensions may vary | Look for explicit JPEG quality and size settings |
| Downloads | May require individual downloads or a ZIP | Often offers individual files or a ZIP |
A browser workflow still needs verification. Download the JPEG, open it locally, check that it has the expected orientation, and test it in the portal where it will be used. For a non-sensitive image and a quick deadline, browser conversion is often more practical than troubleshooting codecs. A separate quick HEIC-to-JPG conversion option can also be considered when you need a simple browser-based route.
Balancing Quality, File Size, and Color
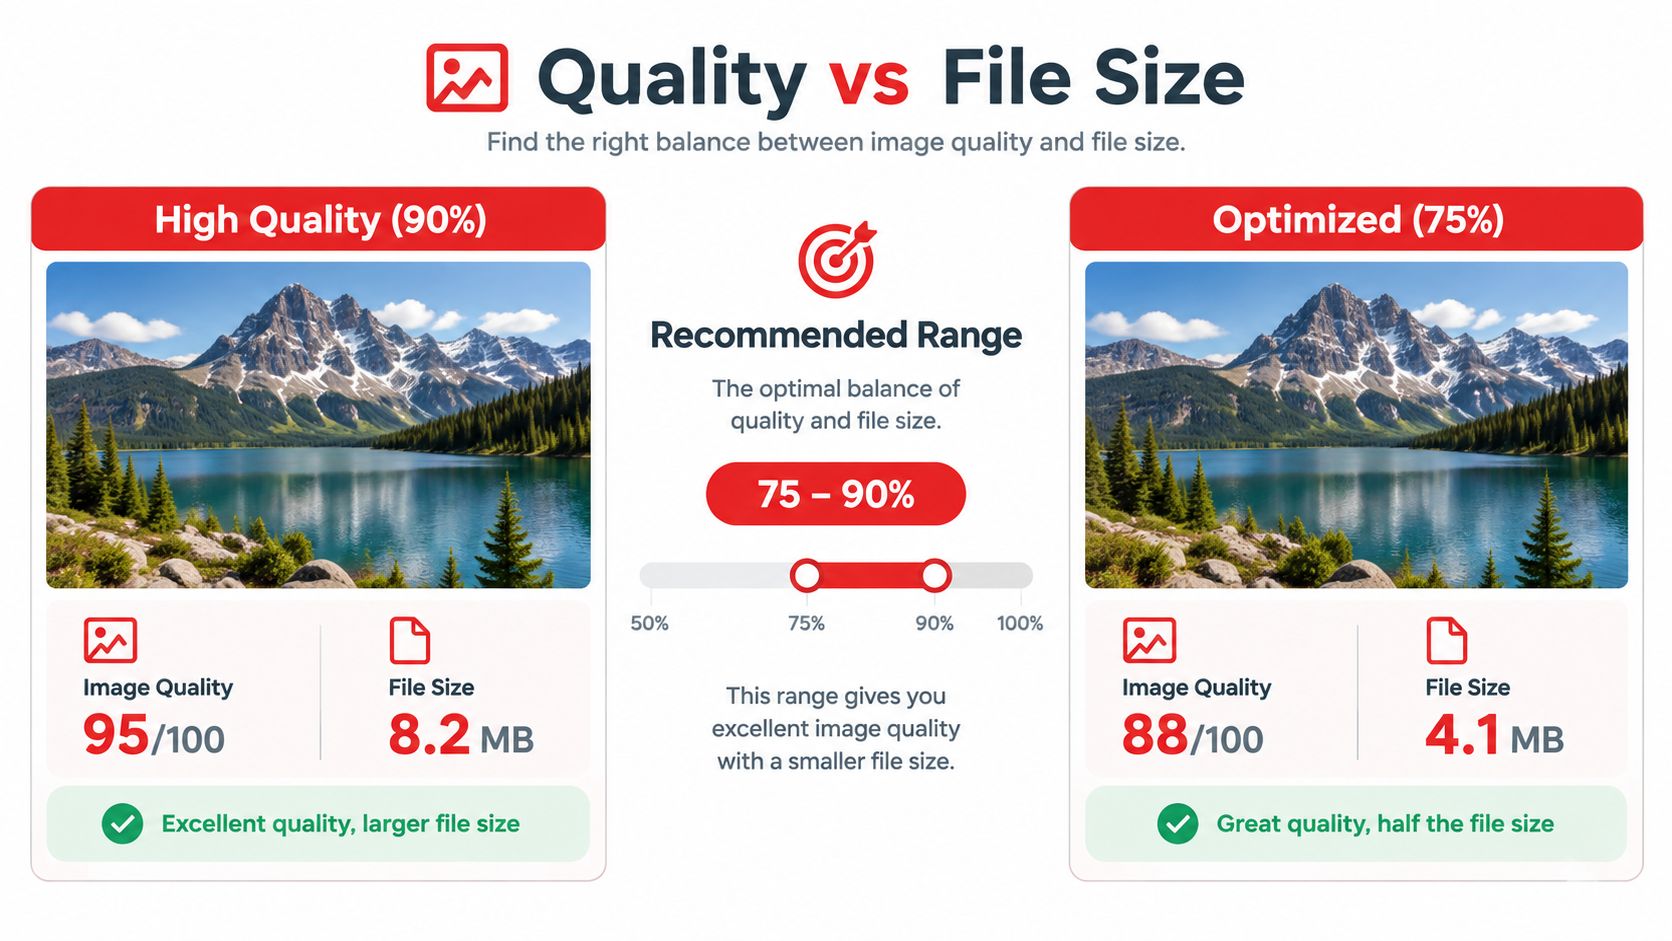
JPEG settings decide whether a converted image looks clean or unnecessarily large. A practical starting point for photographs is quality 90–95, followed by visual inspection of fine texture, gradients, skin tones, and text. That range is a starting point, not a universal rule. A portal may prioritize a small upload, while an image intended for print or later review may justify a larger file.
Avoid accepting an undocumented default when the converter offers no explanation of its quality setting. Very aggressive compression can create block patterns, ringing around text, and smeared detail. Excessive quality can preserve detail that the destination doesn't need while producing a file larger than necessary.
Treat color as a conversion setting
Modern HEIC images may use a wide-gamut profile. If the converter carries that profile into a JPEG workflow that expects sRGB, the result can look desaturated or shifted on another device. A reliable process inspects the source ICC profile and explicitly converts the rendered output to sRGB before JPEG encoding.
Compare the original and JPEG in an sRGB-aware viewer. Check saturated colors, dark shadows, smooth skies, and skin tones. If the JPEG looks dull while the HEIC looks normal, color management is a more likely explanation than a bad camera image.
Plan for larger output
HEIF can provide roughly twice the compression efficiency of JPEG at comparable visual quality, according to Apple's support guidance. As a result, converting an entire library can substantially increase storage requirements even when the pixel dimensions stay the same.
JPEG is also an 8-bit, lossy format, so the conversion can't be mathematically lossless. Save the HEIC original, create the JPG once, and avoid editing and re-saving that JPG repeatedly. Each additional JPEG save can compound quantization and chroma-subsampling artifacts.
For a destination that imposes a strict limit, reduce dimensions only when necessary and keep a full-size master separately. A practical image file-size guide can help when the conversion succeeds but the resulting file still exceeds the upload requirement.
Verifying Conversions and Fixing Common Failures
A saved file isn't necessarily a usable file. The conversion is complete only when the JPEG opens correctly and the intended portal accepts it. This matters in HR onboarding systems, school submissions, insurance forms, legal filing systems, and any workflow that gives you no useful error message.
Open the output and check the basics:
- Dimensions: Confirm that the pixel dimensions match the source unless you deliberately resized it.
- Orientation: Make sure a portrait image hasn't rotated sideways because the viewer ignored orientation metadata.
- Color: Compare the JPEG with the HEIC in an sRGB-aware viewer.
- File size: Check the portal's limit and reduce dimensions or quality only when required.
- Upload behavior: Test the actual destination, not just your computer's image viewer.
Match the symptom to the fix
A gray preview usually means the destination can't decode HEIC, or the JPEG was created by renaming rather than conversion. Re-export the original through a real JPEG workflow.
A washed-out image points to a color-space or ICC-profile mismatch. Render to sRGB before encoding and compare the result in a color-aware viewer.
An accepted JPEG that still fails during submission may have dimensions, file size, or profile restrictions. Create a new copy with explicit sRGB output, verify the dimensions, and test again.
A batch with missing files needs a file-by-file count and spot check. Keep the source folder unchanged, write outputs to a separate folder, and identify failed items instead of assuming the process completed.
Verification beats assumption. The file extension tells you what the filename claims. Opening and uploading the file tells you what it actually does.
The reason JPG remains the dependable target is straightforward. JPEG's international standard dates to 1992, and its implementation across browsers, cameras, printers, document systems, and enterprise software gives it unusually broad reach. HEIC is the efficient source format when your devices support it. JPG is the practical delivery format when compatibility matters.
PDFWix provides browser-based tools for converting HEIC images to JPG, including batch processing, selectable quality, and downloads for individual files or a ZIP archive. Visit PDFWix when you need to create upload-ready image copies without installing software, and keep the original HEIC files safely archived.