
Tomorrow morning you need a twelve-page reading on paper, and twelve sheets feels wrong when six would do. Or the draft on your screen runs to thirty pages and the review meeting needs something people can hold, mark up and carry out in a bag. Either way you open Print, find a control marked Pages per sheet, set it to 4, and hit go.
The pages come back in the wrong sequence, a footer has vanished off the bottom edge, and the body text is small enough that you have to lean toward the window to read it. Nothing is broken. One menu answered two separate questions at once: how pages are arranged on the sheet, and how far the content inside each page shrinks.
Getting how to print multiple pages on one sheet PDF right means separating those two answers, choosing one place to control the layout, and proving the result on a single sheet before you commit the stack. That's the order everything below follows.
Table of Contents
- Choose 2-Up or 4-Up Before You Print
- Use N-Up for Handouts and Booklet Mode for Folds
- Print Several PDF Pages on One Sheet
- Keep Scaling and Orientation From Eating the Type
- Fix Clipped Edges, Tiny Type and Bad Order
- Proof One Sheet Then Print the Full Job
Choose 2-Up or 4-Up Before You Print
A 12-page reading can become a six-sheet packet at 2-up. A 30-page draft can fit on eight sheets at 4-up, with two unused spaces on the last sheet. The right choice depends on what readers need to see: 2-up leaves more room for text, while 4-up saves paper but shrinks each page further.
N-up printing places multiple PDF pages in a grid on one physical sheet. In a 2-up layout, each page occupies one of two cells; in 4-up, each occupies one of four. The page content stays intact, but its printed size changes to fit the cell.
Three jobs that look the same in the print dialog
- Printing separate files together. Three unrelated PDFs remain three separate jobs. Each begins on a fresh sheet unless you combine the files first.
- Scanning paper into one file. A scanner creates a PDF with a page for each scan. That captures pages; it does not arrange several PDF pages on one printed sheet. See how to scan multiple pages into one PDF.
- Combining pages into one continuous page. This reduces the page count by joining content into a tall or wide page. It serves a different purpose from printing several separate pages on one sheet. See merging PDF pages into one page.
A simple area estimate helps, but it does not guarantee legibility. At 2-up, each page gets about half the sheet; at 4-up, about a quarter, before margins and scaling are considered. The University of Utah printing FAQ explains the N-up distinction and warns that whitespace around page images can make the printed text smaller than expected.
For a 30-page draft at 4-up, divide 30 by 4 and round up: the job takes eight sheets. The last sheet holds two pages, leaving two empty cells.
A practical rule: choose 2-up for body text, footnotes and tables. Use 4-up for slides, outlines or large type, then check the smallest text. Choose 6-up or 9-up for thumbnails and quick visual reference, not reading prose.
| Layout | Pages on one sheet | Approximate area per page before margins | Best use | Readability |
|---|---|---|---|---|
| 2-up | 2 | About half the sheet | Body text, legal pages, academic papers | Safest choice for small type |
| 4-up | 4 | About one quarter of the sheet | Slides, outlines, draft review | Check the smallest text |
| 6-up | 6 | About one sixth of the sheet | Slide handouts and quick reference | Body text may be too small |
| 9-up | 9 | About one ninth of the sheet | Thumbnails and archive indexes | Rarely suitable for prose |
Use N-Up for Handouts and Booklet Mode for Folds
A 12-page draft printed two pages per sheet will make six sheets. Fold those sheets down the middle, though, and the pages may no longer read in sequence. For a folded booklet, the printer needs pages arranged in signature order: the outer sheet holds the first and last pages, with the remaining pairs nested inside.
N-up and booklet imposition arrange pages differently. N-up places pages in reading order in separate cells on a flat sheet. Booklet mode rearranges them for folding and binding. It usually requires two-sided printing and the right binding orientation.
Which layer owns the layout
The PDF viewer and printer driver may each offer a pages-per-sheet setting. If both are set to 2-up, each can shrink the pages again, leaving four reduced pages on a sheet. Choose one place to control the layout, and leave the other set to one page per sheet.
Two n-up controls do not cancel each other. They apply in sequence.
For a printer without automatic two-sided printing, test the paper feed before running the full job. Print a couple of sheets, reload them, and check that the reverse side is upright. Long-edge flipping suits a portrait packet bound along its long edge. Short-edge flipping suits pages in a wide format or a pad that flips over the top.
Mixed portrait and horizontal pages can also disrupt a job. A single orientation setting may rotate some pages or shrink them to fit. Check the preview, and print the horizontal page range as a separate job if needed.
Add headers or page numbers while the document is still in its original page layout. For example, the PDFWix page numbering tool can add numbers before the pages are arranged on each sheet. Numbers added after imposition may shrink with the page images and appear inside the cells rather than at the sheet edge.
Choose the method that matches the finished paper, then open the print dialog.
| Goal | Method | Wrong choice |
|---|---|---|
| Handout, slides or draft review | N-up, usually 2 or 4 pages per sheet | Booklet order scrambles a packet that will not be folded |
| Folded and stapled booklet | Booklet imposition with the correct two-sided flip | Plain n-up does not arrange pages in signature order |
| Several PDFs as separate jobs | Print each file as its own job | N-up can place unrelated files on shared sheets |
| One continuous composite page | Use a workflow that combines pages into one page | N-up keeps each source page in its own cell |
Print Several PDF Pages on One Sheet
A 12-page handout needs to fit in a small packet, or a draft needs a quick paper review. The print dialog's pages-per-sheet setting controls how many PDF pages share each physical sheet. Choose that layout in one place, set the page range, then check a printed sheet before sending the whole job.
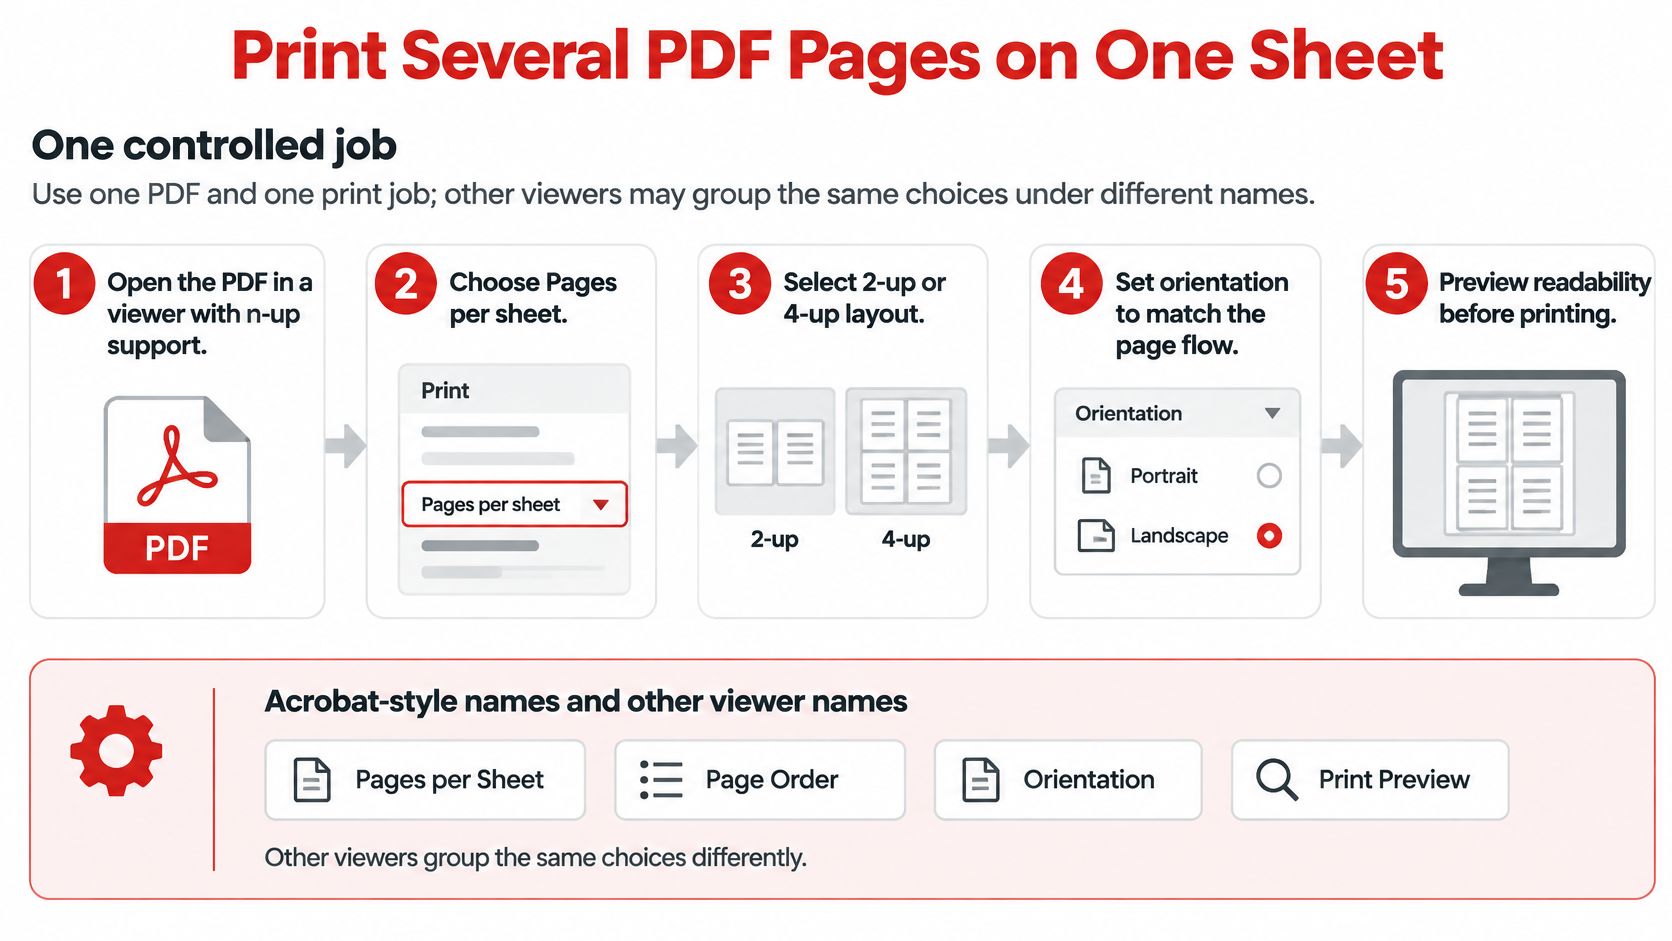
The steps, and the failure each one prevents
- Open the PDF in a desktop viewer with N-up printing. Some lightweight mobile viewers only print one page per sheet, so check that the setting is available before preparing the job.
- Choose Print and set the page range. Leaving out blank, confidential or appendix pages changes how many sheets you need and keeps unwanted pages out of the packet.
- Select Multiple, or the equivalent pages-per-sheet option. This is the layout control for the sheet. If the printer driver also offers a pages-per-sheet setting, leave it at one so the pages are not arranged twice.
- Choose two or four pages per sheet. Use two when the text needs to stay easy to read; four can suit compact drafts or slides, but makes each page smaller.
- Set the page order. Horizontal order reads across each row. Vertical order fills down each column. Reversed orders suit a specific reading or binding direction, not a layout problem you have yet to identify.
- Choose paper size and orientation. Match the sheet to the job, such as portrait paper for portrait pages or a wider sheet for slides.
- Inspect the preview. Check that pages follow the intended sequence, sit upright and remain inside their cells. Note any blank space where the last page occupies only part of a sheet.
- Print one sheet and read it at normal distance. If the type is too small, reduce the number of pages per sheet before printing the rest.
Some print dialogs offer custom layouts with as many as 99 pages per sheet. In practice, that many pages leaves little room for readable text. For handouts, start with two or four and judge the result on paper.
The PDF keeps its page layout as pages are arranged on a sheet. For exam revision, GCSE Past Papers can provide material for a two-page-per-sheet handout, leaving more room on the sheet than a four-page layout.
If a few wide slides sit among portrait pages, rotate those pages with Rotate PDF before printing. That gives the pages a consistent orientation without changing the selected pages-per-sheet layout.
Keep Scaling and Orientation From Eating the Type
A handout can look balanced in the print preview and still come out too small to read. The reason is often that the PDF layout and the printer driver are both shrinking the page. Let the pages-per-sheet setting arrange the pages, and use one scaling setting to fit that arrangement onto the paper.
Give each scale mode one job
Use Fit when the arranged pages need to stay inside the printer's printable area. Actual Size preserves the page's dimensions, so content near the edge may be clipped if it falls outside that area. Shrink Oversize Pages reduces larger pages without enlarging smaller ones. Choose Custom Scale only when you have a specific percentage in mind.
Paper dimensions and printable area are different: the printer may leave an unprinted margin around the sheet. For 4-up, each page gets roughly half the sheet's width and half its height before margins and gaps are accounted for. That leaves less room for text than the grid alone suggests.
Check the actual page size
The preview helps you check placement, but it cannot tell you whether small print will be comfortable to read on paper. Check the page with the smallest text, along with any table or content close to an edge. If the source PDF's page dimensions do not suit the paper, resize PDF pages to A4, Letter or Legal before printing.
| Scale mode | Use when | What to keep in mind |
|---|---|---|
| Fit | The arranged pages must stay inside the printable area | It may reduce the pages |
| Actual Size | The original dimensions suit the paper and margins | Edge content may be clipped |
| Shrink Oversize Pages | Large pages need reducing while smaller ones stay their size | Page sizes may appear uneven |
| Custom Scale | You know the percentage required | Check that text remains readable |
Set the same paper size in the print dialog and printer settings. Choose either the application or the printer driver to scale the job, rather than letting both do it. Use a printed sheet to judge readability, especially for 4-up.
Fix Clipped Edges, Tiny Type and Bad Order
Treat the one-sheet proof as the checklist, change one setting for each symptom, and reprint only the test sheet. The mapping below covers almost everything that goes wrong.
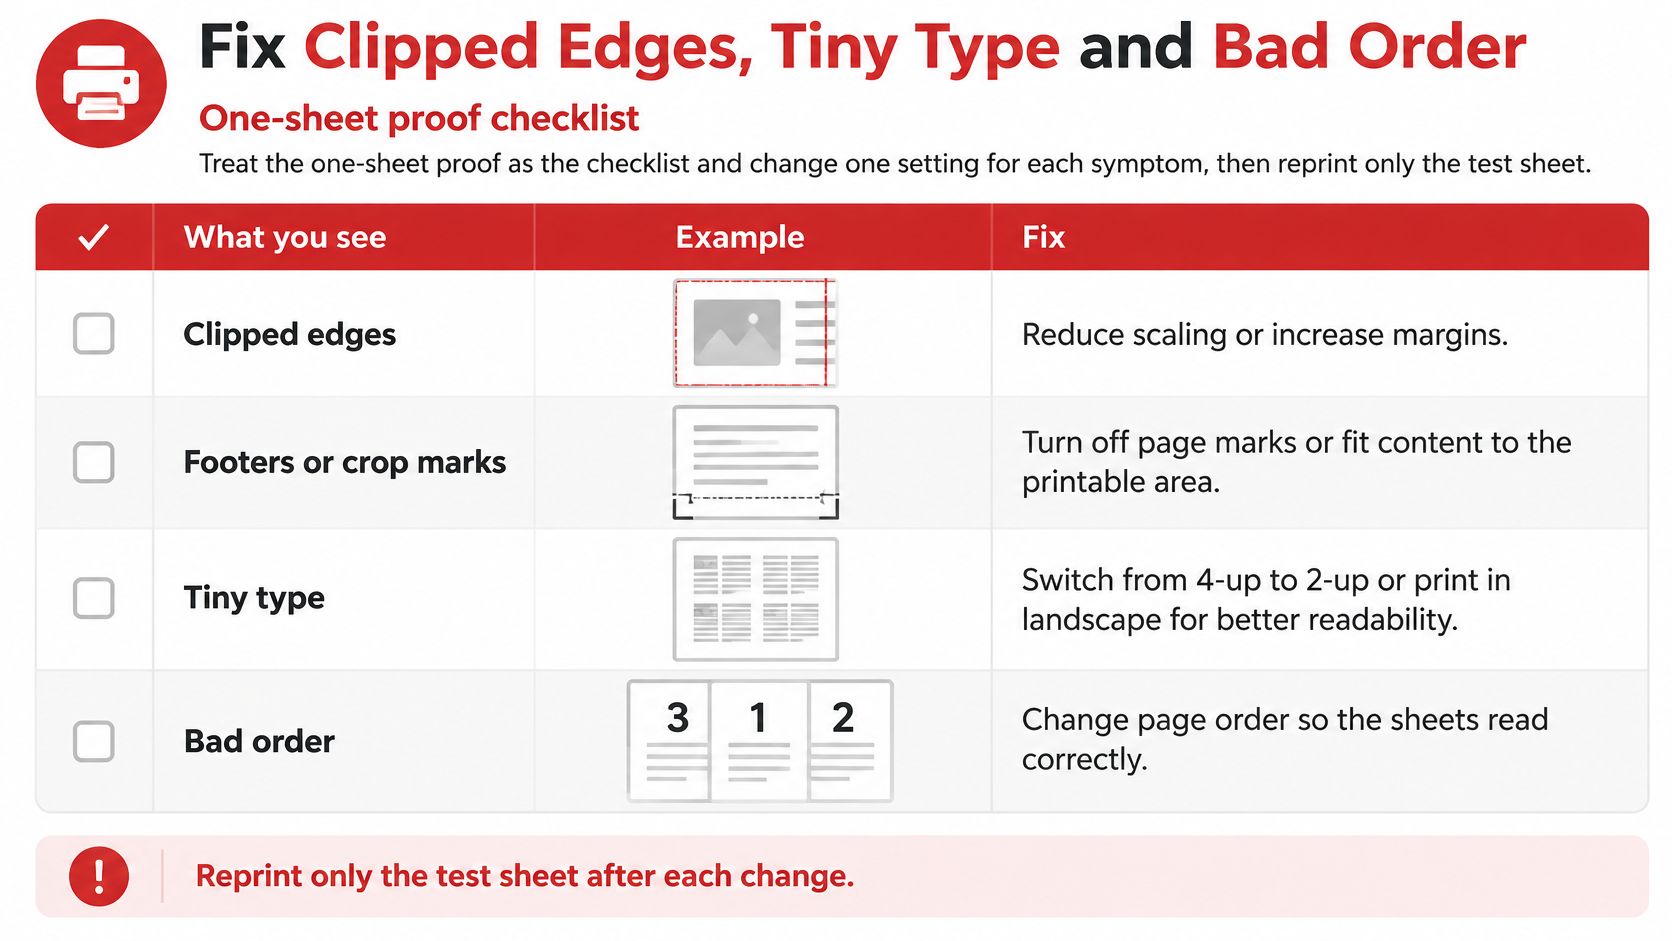
| Symptom | Setting to change |
|---|---|
| Edges, footers or crop marks vanish | Switch Actual Size to Fit or lower Custom Scale; stop any driver fit |
| Type too small in 4-up | Drop to 2-up before changing fonts |
| Pages read down the sheet | Change vertical order to horizontal |
| Back side upside down | Flip on the other edge; test on a spare sheet |
| Lonely cell on last sheet | Normal remainder; do not add blank source pages |
| Portrait and landscape pages conflict | Print those page ranges separately |
| Output looks imposed twice | Turn n-up off in the application or the driver |
Change one variable at a time. If two fixes go in together and the sheet improves, you won't know which one to keep for the full run. And if the sequence itself is what's wrong, correcting it at the source first with the guide to reversing PDF page order is cleaner than trying to talk the layout into a different arrangement.
Proof One Sheet Then Print the Full Job
A clean proof gives you a reliable template for the full run. Keep the original PDF unchanged, then print the same page range with the paper size, scale, reading order and duplex setting used for the proof. Change one of those settings, and the result may no longer match.
When the viewer has no pages-per-sheet control
Some PDF viewers lack a pages-per-sheet setting. You may also need a layout saved as a PDF to send to a print shop or reuse later. PDFWix's Multiple Pages per Sheet tool creates a new PDF with 2, 4, 6 or 9 pages on one sheet. Proof the downloaded file before printing the full batch. The design, margins and chosen layout still determine how large the text appears.
If the proof is hard to read, discard that output and adjust the layout before trying again. Keep the original file so you can start over without losing the source.
For material spread across separate files, print several PDF files at once as separate jobs when the documents are not meant to share a sheet.
If you want the layout saved in a PDF, PDFWix's free Multiple Pages per Sheet tool creates a file you can send, archive or reprint. Visit PDFWix when you're ready to prepare a handout or draft.